Creating images from SwiftUI views
23 Dec 2020
Update: I now have a much-better way to do this and this post should be considered deprecated. See a better way to create images from SwiftUI views for the new-and-improved solution.
Original post
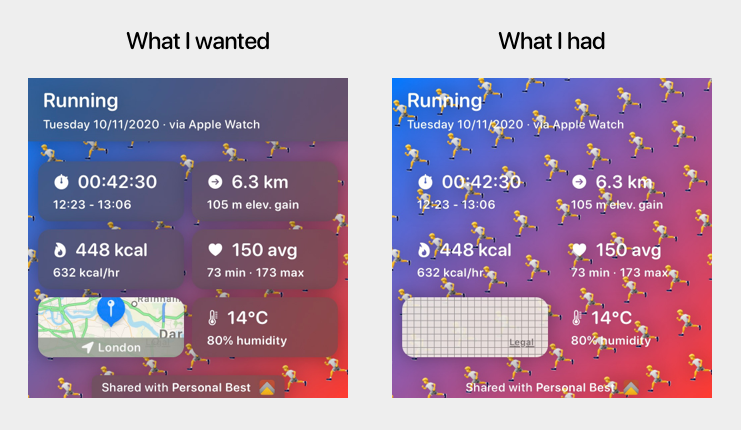
Recently while developing a workout sharing feature for my app Personal Best, I needed to figure out how to turn a SwiftUI view into an image that people could share.
I struggled with this for a while but in the end got it to work. In this article I’m going to talk about what I discovered about UIKit and SwiftUI, some unsuccessful attempts I tried, then finally what I did in the end to get it working correctly.
The initial problem
The problem is quite straightforward. We can easily create an image from any view in UIKit, but SwiftUI views don’t have this ability. So, we need some way to convert a SwiftUI view to a UIKit one.
First attempt
After some research, I found a code snippet on GitHub that I could use. I copied it into a new SwiftUI project as a proof of concept, and it seemed to work perfectly.
The most important parts of the code are the extensions on View and UIView, so let’s take a look at those. I’ve added some comments to the code to explain what’s happening at each point.
extension View {

  // Requires the origin and size of the view. These can be gotten
  // from the view using a GeometryReader.
  func takeScreenshot(origin: CGPoint, size: CGSize) -> UIImage {

    // Create a UIKit window which has the same dimensions and size as the SwiftUI view.
    let window = UIWindow(frame: CGRect(origin: origin, size: size))

    // Wrap the SwiftUI view into a UIKit view hierarchy.
    let hosting = UIHostingController(rootView: self)

    // Make the hosting view's size match the window's size.
    hosting.view.frame = window.frame

    // Add the hosting view to the window.
    window.addSubview(hosting.view)
    window.makeKeyAndVisible()

    // Create an image from it (see UIView extension below).
    return hosting.view.renderedImage
  }
}

extension UIView {
  var renderedImage: UIImage {

    // The size of the image we want to create, based on the size of the
    // current view.
    let rect = self.bounds

    // Start an image context, using the rect from above to set the size.
    UIGraphicsBeginImageContextWithOptions(rect.size, false, 0.0)
    let context: CGContext = UIGraphicsGetCurrentContext()!

    // Render the current view into the image context.
    self.layer.render(in: context)

    // Extract an image from the context.
    let capturedImage: UIImage = UIGraphicsGetImageFromCurrentImageContext()!

    UIGraphicsEndImageContext()
    return capturedImage
  }
}
This did work perfectly in the proof of concept, but as soon as I tried to integrate it into my app I ran into a problem. The view I wanted to turn into an image included blur effects and a map view, and neither of those were appearing in the final image. In the case of the map view, the map was there but the image was captured before the tiles had a chance to load.
Next attempt
I read some Apple documentation and discovered the drawHierarchy API, so I tried using this instead. I changed the UIView extension to look like this:
extension UIView {
  var renderedImage: UIImage {
    let rect = self.bounds
    UIGraphicsBeginImageContextWithOptions(rect.size, false, 0.0)
    let renderer = UIGraphicsImageRenderer(bounds: rect, format: UIGraphicsImageRendererFormat())
    let image = renderer.image { (context) in
      self.drawHierarchy(in: rect, afterScreenUpdates: true)
    }
    UIGraphicsEndImageContext()
    return image
  }
}
I have no idea why, but this just produced a white square.
Finding a workaround
Setting aside the white square issue, I thought about the problem a bit more. I was creating a copy of my SwiftUI view and then capturing it before it had time to finish updating, which is why the map tiles were blank. I looked around for a way to delay the image capture until the view had time to update but didn’t find anything. I also experimented with using sleep and wait as hacks, but they didn’t work for me either.
I decided to take a different approach. If a user manually screenshotted the screen and cropped it, the image would be perfect. Is there a way I could do that programmatically? After quite a lot of trial and error I figured it out.
Here’s how the code for that looks. I’ve added comments to each line to explain what’s happening.
extension View {
  func takeScreenshot(origin: CGPoint, size: CGSize) -> UIImage? {

    // Get the main window.
    guard let window = UIApplication.shared.windows.first else {
      print("View.takeScreenshot: No main window found")
      return nil
    }

    // Create an image of the entire window. Note how we're using `window.bounds` for this
    // to capture the entire window.
    UIGraphicsBeginImageContextWithOptions(window.bounds.size, false, 0.0)
    let renderer = UIGraphicsImageRenderer(bounds: window.bounds, format: UIGraphicsImageRendererFormat())
    let image = renderer.image { (context) in
      window.drawHierarchy(in: window.bounds, afterScreenUpdates: true)
    }
    UIGraphicsEndImageContext()

    /*
    At this point we have a screenshot of the entire window.
    Now we're going to crop it to just include the part of the screen
    we want.
    */

    // Scale is the pixel density of the screen. E.g. 3.0 on iPhone 12 Pro which has a 3x display.
    // This will be used in the UIImage extension below.
    let scale = UIScreen.main.scale
    let rect = CGRect(x: origin.x, y: origin.y, width: size.width, height: size.height)
    let croppedImage = image.cropped(boundingBox: rect, scale: scale)

    return croppedImage
  }
}

extension UIImage {
  func cropped(boundingBox: CGRect, scale: CGFloat) -> UIImage? {

  /*
  To crop UIImage we must first convert it to a CGImage.
  UIImage uses points, which are independent of pixels.

  Therefore, we need to take the scaling factor of the screen into account
  when cropping.

  For example, if we want to crop a 100x50pt square starting at (75, 90) from a UIImage
  on a device with a 2x scaling factor, we would multiple everything by 2 and crop a
  200x100px square starting at (150, 180).
  */

    let x = boundingBox.origin.x * scale
    let y = boundingBox.origin.y * scale
    let width = boundingBox.width * scale
    let height = boundingBox.height * scale

    let adjustedBoundingBox = CGRect(x: x, y: y, width: width, height: height)

    guard let cgImage = self.cgImage?.cropping(to: adjustedBoundingBox) else {
      print("UIImage.cropped: Couldn't create cropped image")
      return nil
    }

    return UIImage(cgImage: cgImage)
  }
}
I tried it and it worked! My image came out with all the UI elements exactly as they were shown on screen.
This solution isn’t perfect. For one thing, it’ll only work for views that are fully on screen. It’s also bound to the scaling factor of the device it runs on, so running this on a 2x screen will produce a smaller image than running it on a 3x screen. That being said, it works for my needs and it gives me a good base from which to iterate if I need more advanced functionality.
As SwiftUI matures I expect it’ll gain more of this functionality ‘out of the box’ so these workarounds aren’t needed. For now, this does the trick.
Thanks for reading.
To get in touch, email me or find me on Mastodon.
If you liked this post, you'll love my iOS apps. Check them out below.